We integrate innovative approaches into our design, with discernment and mental acuity, to elevate architecture and inspire.
E. Copy/Monitor Levels
Aethera Engineers Revit Setup Standard
- Preface
- Cleaning Up Linked Revit Model
- Linking an Architectural Revit Model
- Import Parameters from Architectural Model
- Copy/Monitor Levels
- Creating Floor Plans
- Copy/Monitor Grids
- Enable Room Bounding
- Adding Spaces and Space Tags
- Creating Central and Local Files
- Creating Sheets
- Inserting Interim Review Stamps and Logo
- Process Central Model to Send to Clients
- Double-click on one of the default elevation views within the Project Browser.
- Zoom into the edge of the building where the Levels are shown, typically on the right-hand side of the elevation view, by pressing the (Z) and (R) keys in succession.
- Notice by default there are 2 levels created. These can be changed to match the heights of the first two levels of the building by double-clicking the numbers and changing them to match the exact heights shown.
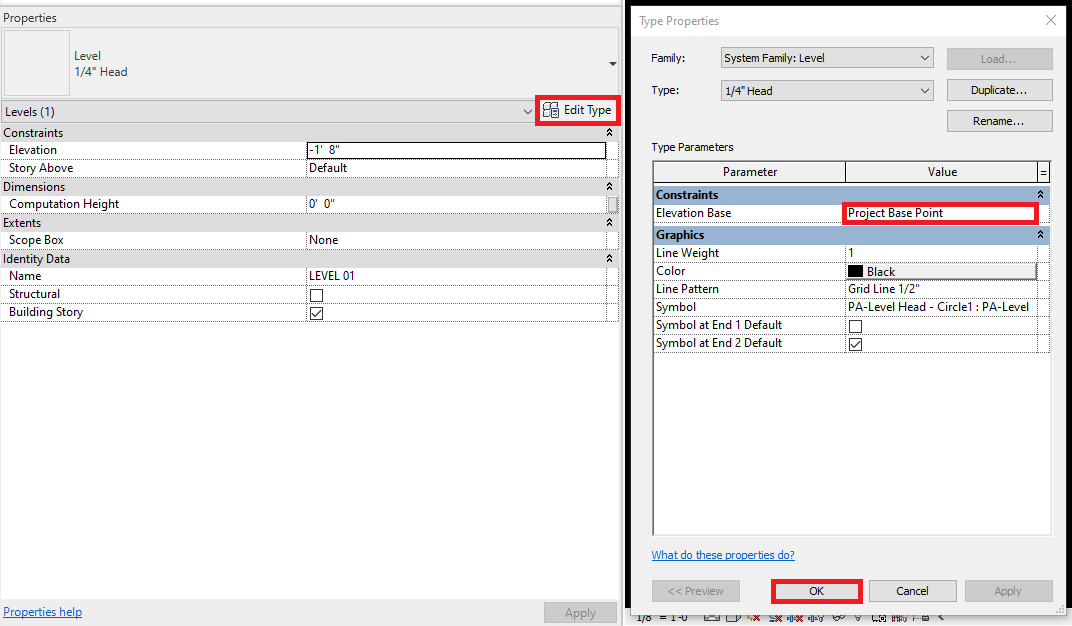
- If the elevations at Level 1 align vertically, but do not have equivalent numerical values, as shown above, left click on Level 2. Within the Properties browser, click Edit Type. Under Constraints, select Survey Point, instead of Project Base Point.
- In the Ribbon, from the Collaborate tab choose Copy/Monitor and click Select Link from the drop-down menu.
- Select the building model by left-clicking on any part of it.
- Click the Monitor button. Select the Æ first level and then the linked Revit model first level. The first and second levels are now being monitored.
- Next, in the Copy/Monitor menu, click Copy, and select the check box for Multiple.
- Holding the (Ctrl) button, individually click on the remaining levels of the linked Revit model. Click Finish, to complete the Copy operation. Then click Finish to exit the Copy/Monitor Ribbon element.
- All levels are now copied from the linked Revit model and are monitored for any changes that happen due to linked Revit model revisions in the future. This can be verified by clicking on any Æ model level and glancing at the Ribbon to see if the Stop Monitoring button appears. Do not press the button, as this is only for verification.


